

Are you looking for a creative and simple way to make a charming toy that brings joy to kids and adults alike? Making a felt toy doll is a fun project you can easily do at home, even if you’ve never tried crafting before.
Imagine holding a soft, colorful doll made by your own hands—something unique, full of personality, and perfect for gifting or decorating your space. In this guide, you’ll discover clear, step-by-step instructions that make the process enjoyable and stress-free. Ready to start?
Let’s dive into making your very own felt toy doll!
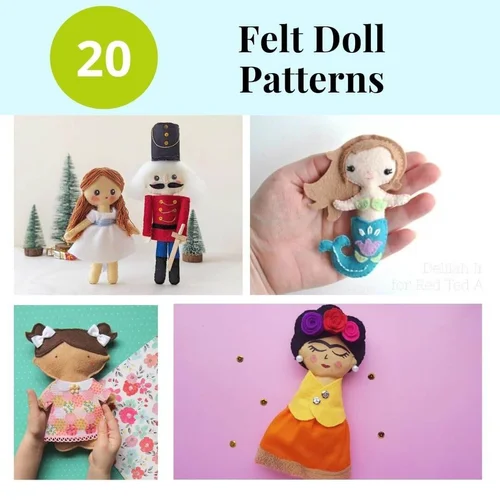
Credit: www.funclothcrafts.com
Materials Needed
Gathering the right materials is the first step to making a fun and easy felt toy doll. Having everything ready saves you time and frustration during the crafting process. Plus, it ensures your final doll looks neat and lasts longer.
Choosing The Right Felt
Not all felt is the same. You want to pick felt that is soft but sturdy enough to hold the doll’s shape. Wool felt is thicker and more durable, while acrylic felt is cheaper and easier to find in many colors.
Think about the colors that will bring your doll to life. Do you want bright, bold hues or soft pastels? A mix of both can add charm and personality to your creation.
Essential Tools
Having the right tools makes your work smooth and enjoyable. Sharp scissors designed for fabric will give you clean cuts without fraying the edges. A good sewing needle and matching thread are crucial, especially for small details.
- Fabric scissors
- Sewing needles
- Colored thread or embroidery floss
- Stuffing material like polyester fiberfill
- Pins to hold pieces together
- A fabric marker or chalk for outlining shapes
Do you have a favorite tool that always helps you craft better? Keep it close—it might be the secret to your best doll yet.
Optional Decorations
Adding decorations lets you personalize your doll and make it truly unique. Buttons can become cute eyes, and ribbons add a playful touch. You might also use small beads, sequins, or fabric paint for extra flair.
Don’t feel pressured to add too many extras. Sometimes, simple is best, especially if you’re making the doll for a child who will love it just the way it is.

Credit: www.youtube.com
Basic Cutting Techniques
Cutting felt for toy dolls requires care and precision. Good cutting techniques save time and make your doll look neat. Felt is soft and easy to cut, but it can shift if not handled well.
Start by preparing your work area. Use a flat, clean surface and sharp scissors. Sharp scissors give smooth edges and prevent tearing.
Creating Templates
Templates guide your cutting and help keep shapes consistent. Use paper or thin cardboard for templates. Draw your desired shapes clearly on the template.
Cut out the template carefully with scissors or a craft knife. Pin or place the template on the felt before cutting. This stops the felt from moving around.
Cutting Felt Shapes Accurately
Hold the felt firmly but gently. Cut slowly along the edge of the template. Use small, precise cuts to avoid jagged edges.
For curves and details, rotate the felt instead of the scissors. This gives better control and cleaner cuts. Trim any rough edges after cutting for a polished look.
Simple Sewing Methods
Simple sewing methods make creating felt toy dolls easy and fun. These techniques need few tools and little skill. Beginners enjoy quick results. Felt is soft and forgiving, perfect for hand stitching or glue. Choose a method that fits your comfort level and time.
Hand Stitching Basics
Hand stitching is the classic way to sew felt dolls. Use a sharp needle and strong thread or embroidery floss. Basic stitches like running stitch and whip stitch hold pieces together well.
- Thread the needle and knot the end.
- Align felt pieces and start sewing from inside.
- Use small, even stitches for neat edges.
- Secure thread with a knot when finished.
Take your time and keep stitches close. This keeps stuffing inside and gives a clean look. Hand stitching allows you to add simple details, like facial features or decorations, using embroidery.
Using Glue For No-sew Options
Glue offers a fast, no-sew option for making felt dolls. Use fabric glue or hot glue for best results. Glue works well for attaching small parts or adding embellishments.
- Cut felt pieces to size.
- Apply glue thinly to the edges.
- Press pieces firmly and hold for a few seconds.
- Let glue dry completely before handling.
Glue is a good choice for kids or quick projects. It saves time and avoids needles. Some felt dolls can be fully glued, but stuffing may be tricky. Combine glue and hand stitching for extra strength.
Adding Personality
Adding personality to your felt toy doll transforms it from a simple craft into a charming companion. This step allows you to express creativity and make each doll unique. Think about the character you want your doll to have—cheerful, shy, adventurous—and let that guide your choices.
Decorating Faces
The face is the heart of your doll’s personality. Use embroidery thread or fabric markers to create expressive eyes, eyebrows, and smiles. Small details like eyelashes or freckles can change the whole mood of the doll.
Try stitching tiny dimples or adding a blush with soft pastels for a warm, friendly look. Don’t hesitate to experiment with different shapes of eyes—round, almond, or even sleepy—to see how they affect your doll’s expression. Have you ever noticed how a slight curve in the smile can make a doll look kind or mischievous?
Personalizing With Accessories
Accessories give your doll its style and story. Think about scarves, tiny hats, or even miniature glasses to bring your creation to life. You can sew on buttons, beads, or little ribbons that match the doll’s personality.
Adding a small felt bag or a pet companion can make your doll feel more complete. Consider the seasons or hobbies your doll might have; a felt flower crown for spring or a tiny backpack for an explorer look adds depth. What kind of accessories would tell your doll’s story best?

Credit: www.youtube.com
Frequently Asked Questions
What Materials Are Needed For Making Felt Toy Dolls?
You need felt sheets, scissors, needles, thread, stuffing, and fabric glue. Optional items include buttons and markers for decoration. These basic materials make crafting easy and fun.
How Do You Sew Felt Pieces Together Securely?
Use a blanket stitch or running stitch with strong thread. Hand stitching ensures durability and neat edges for your felt doll. Keep stitches small and tight for the best finish.
What Are Simple Designs For Beginner Felt Dolls?
Start with basic shapes like animals, hearts, or simple human figures. Use minimal pieces and easy stitching patterns. These designs help beginners practice skills without complexity.
How Can I Personalize My Felt Toy Doll?
Add unique details like embroidered names, facial features, or accessories. Use colorful felt pieces and decorative buttons. Personalization makes each doll special and unique.
Conclusion
Creating a felt toy doll is simple and enjoyable. This craft suits all ages and skill levels. With basic materials, you can make cute and unique dolls. Your creativity shapes each doll, making it special. Children love these soft, handmade toys.
Plus, they’re perfect gifts for friends and family. Crafting felt dolls also strengthens bonding time with loved ones. Just gather your supplies and start crafting today. Enjoy the process and cherish your creations. Celebrate your handmade success and share the joy with others.
Each doll tells a story. Let yours be magical!