
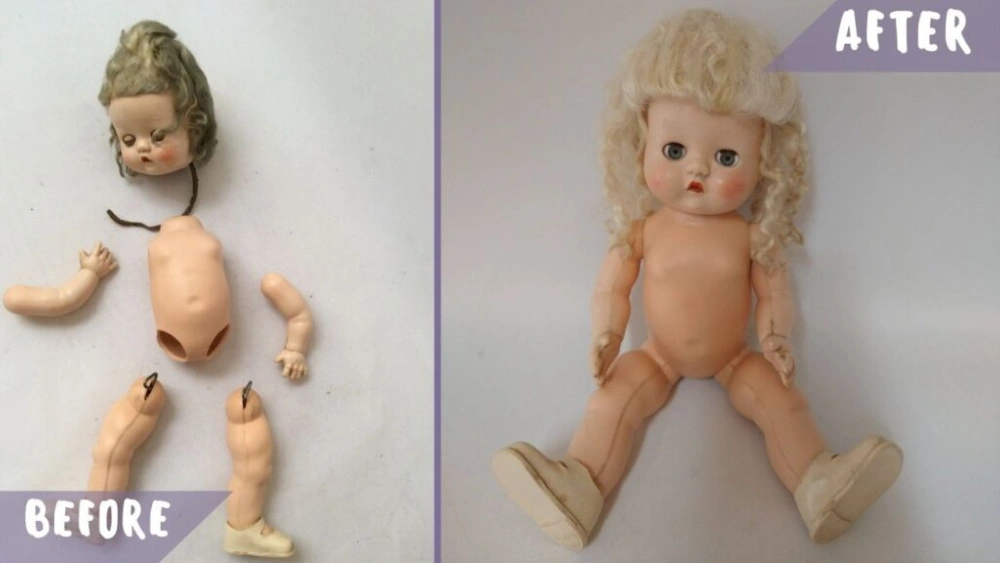
Do you have a beloved vinyl doll that’s showing signs of wear and tear? You’re not alone.
Many doll enthusiasts face the challenge of keeping their cherished collectibles in pristine condition. Whether it’s a scuff mark, a small crack, or discoloration, these common issues can be disheartening. But here’s the good news: with a little know-how and some simple techniques, you can restore your vinyl dolls to their former glory.
This guide will walk you through effective repair methods that can save your dolls from further damage, ensuring they remain a cherished part of your collection for years to come. Curious to know how you can bring your dolls back to life? Keep reading, and discover the secrets to reviving your vinyl treasures with ease and confidence.

Credit: www.reddit.com
Assessing Doll Damage
Vinyl dolls can hold a special place in your heart, reminding you of cherished memories or perhaps even representing a prized collection. However, these beloved dolls are not immune to damage. Before diving into repairs, it’s essential to assess the extent of the damage. This step helps ensure you apply the right techniques and materials for restoration. Let’s explore how you can efficiently evaluate the condition of your vinyl dolls.
Identify Surface Scratches And Scuffs
Start by inspecting the doll’s surface for scratches and scuffs. These are common issues, often caused by handling or accidental bumps. Run your fingers gently across the vinyl to feel any unevenness. Consider the depth of the scratch, as this will determine the type of repair needed. Are they superficial or more profound? Knowing this will guide your next steps.
Check For Discoloration
Discoloration can occur from exposure to sunlight or improper storage. Look for any areas where the color appears faded or altered. Compare these spots with the original hues of the doll, usually visible in less exposed areas. Discoloration may require specific treatments to restore the original shade, so understanding its extent is crucial.
Inspect Joints And Limbs
Examine the doll’s joints and limbs for signs of looseness or detachment. Vinyl dolls often have articulated parts that can become loose over time. Gently move the limbs to check their stability. Are they securely attached? If not, this may involve internal repairs or replacement parts.
Evaluate Cracks And Breaks
Cracks and breaks are serious forms of damage that can compromise the doll’s structure. Inspect the vinyl for any splits or fractures, paying particular attention to high-stress areas like the neck and limbs. Consider the severity of the break—does it require immediate attention? Addressing cracks early can prevent further deterioration.
Assess Paint And Detailing
The doll’s paint and detailing can wear off or chip over time. Look closely at the facial features, clothing details, and any painted accessories. Are there any noticeable chips or faded areas? Restoring these details may involve repainting or touch-ups, requiring a steady hand and an eye for detail.
Assessing the damage to your vinyl doll is the first step in breathing new life into your cherished keepsake. Whether it’s minor scuffs or more significant breaks, understanding the extent of damage helps you choose the most effective repair methods. So, how will you approach your doll’s restoration journey? Remember, patience and attention to detail are your best allies. Your vinyl doll deserves a thoughtful touch to regain its former glory.
Cleaning Techniques
Repairing vinyl dolls involves cleaning with mild soap and water. Use a soft cloth for gentle scrubbing. For stubborn stains, apply diluted vinegar solution.
Cleaning Techniques When it comes to repairing vinyl dolls, cleaning is a crucial first step. It’s not just about aesthetics; clean dolls are less likely to suffer further damage. You might be surprised at how much a good cleaning can revive your doll. Let’s dive into some effective techniques to tackle those common cleaning challenges.
Removing Stains
Stains can be a nightmare, but they’re not impossible to deal with. Start by using a gentle soap and water mixture. Dab the solution onto the stain with a soft cloth and gently rub. Be patient—avoid scrubbing too hard as it might damage the vinyl. For tougher stains, consider using a mild cleaner like baking soda. Mix it with water to form a paste and apply it carefully. Always test on a small area first to ensure it doesn’t affect the color.
Dealing With Mold
Mold is unsightly and can spread quickly if not addressed. Begin by wiping the affected area with a damp cloth. Next, apply a mixture of vinegar and water. This natural remedy can kill mold and prevent its return. After cleaning, let the doll dry thoroughly. Mold thrives in damp conditions, so ensure your doll is stored in a dry, ventilated space. If mold persists, commercial mold removers may be necessary, but use them sparingly.
General Cleaning Tips
Regular maintenance is key to keeping your vinyl dolls in top condition. Dust them weekly to prevent dirt build-up. Use a soft brush or microfiber cloth to gently clean the surface. For a deeper clean, disassemble parts if possible, allowing you to reach hidden areas. While cleaning, pay attention to joints and crevices where dirt tends to accumulate. Do you have a favorite cleaning technique that works wonders for your dolls? Share your insights and help fellow collectors keep their prized possessions pristine!
Repairing Cracks
Repairing cracks in vinyl dolls involves cleaning the damaged area and using a vinyl repair kit. Apply the repair compound, smooth it out, and let it dry completely to restore the doll’s appearance.
Vinyl dolls are cherished collectibles and treasured childhood companions. Over time, they may develop cracks due to age or mishandling. Repairing these cracks can restore their charm and prevent further damage. This section explores effective ways to mend cracks in vinyl dolls.
Using Vinyl Repair Kits
Vinyl repair kits are designed for fixing cracks and scratches. They come with adhesive and tools. Follow the instructions for best results. Clean the cracked area before applying the adhesive. Use a spatula or brush for smooth application. Allow it to dry completely before handling the doll. These kits provide a professional finish.
Diy Solutions
For those who prefer homemade fixes, DIY methods can be effective. One option is using clear nail polish. Apply it gently over the crack. This seals and protects the area. Another option is using a mixture of baking soda and super glue. Mix them to form a paste. Apply the paste over the crack. Let it dry and sand lightly for a smooth finish. These solutions are cost-effective and easy.
Preventing Future Cracks
To keep vinyl dolls crack-free, proper care is essential. Store them in cool, dry places. Avoid direct sunlight and extreme temperatures. Handle them gently and avoid dropping. Regular cleaning with mild soap prevents dirt buildup. Use soft cloths to avoid abrasion. Proper care ensures longevity and beauty.
Credit: www.tiktok.com
Restoring Color
Reviving the vibrant colors of vinyl dolls involves cleaning with gentle soap and water. Carefully use a soft cloth to remove stains. For stubborn discoloration, try applying a mild vinyl cleaner to restore the original hues.
Restoring the vibrant colors of vinyl dolls can bring them back to life. Over time, exposure to light and air can fade their hues. Fortunately, restoring their color is possible with a few techniques. Let’s explore how paints, dyes, and protective methods can revive your beloved dolls.
Using Paints And Dyes
Paints are excellent for precise color restoration. Choose acrylic paints for their versatility and lasting finish. Match the original color by mixing shades. Dyes are useful for larger areas needing color. Fabric dyes work well and soak evenly into the vinyl. Always test on a small area first to check the outcome.
Blending Techniques
Blending helps achieve a natural look. Use soft brushes for smooth transitions between colors. Feather out the edges to avoid harsh lines. Layering light coats creates depth and realism. Practice on spare vinyl pieces to master your technique. A sponge can also help in blending for a seamless effect.
Protecting Restored Areas
After restoring, protection ensures durability. Seal painted areas with clear varnish. This keeps colors vibrant and shields against wear. For dyes, apply a fabric protector spray. This prevents fading and maintains the doll’s new look. Store dolls away from direct sunlight to preserve their color.
Fixing Loose Joints
Fixing loose joints on vinyl dolls involves securing the joint with super glue or epoxy. Apply adhesive carefully and let it dry completely for a sturdy hold.
Fixing loose joints in vinyl dolls can be a rewarding task, giving your cherished collectibles a new lease on life. Over time, the joints of these dolls may loosen due to regular play or even just the passage of time. Addressing this issue not only restores your doll’s poseability but also adds to its longevity. Let’s explore some practical ways to effectively tackle this common problem.
Reinforcing Joints
Reinforcing the joints is a simple and effective way to fix looseness. You can use small rubber bands or elastic string to tighten the joints. By looping them around the joint area, you provide the necessary tension to hold the limbs in place. Consider using a small screwdriver to gently separate the joint, allowing you to better fit the elastic. Always ensure you don’t over-tighten, as this can lead to restricted movement or damage.
Tools Required
Having the right tools at hand can make the repair process smoother. Here’s a handy list to keep your project on track:
- Small screwdriver
- Rubber bands or elastic string
- Needle-nose pliers
- Scissors
- Adhesive (optional, for added reinforcement)
Each tool has a distinct role. For instance, pliers can help with delicate adjustments, while scissors are crucial for trimming excess elastic.
Maintaining Joint Flexibility
Once you’ve reinforced the joints, maintaining flexibility is key. Regularly move the limbs to prevent stiffness. Consider applying a small amount of talcum powder to the joints; it can reduce friction and improve movement. Think about the environment where you store your dolls. Avoid overly humid or dry places, which can affect both the vinyl and the joints. Have you thought about checking your doll’s joints periodically? A quick inspection every few months can catch potential issues early, ensuring that your beloved dolls remain in top condition.
Replacing Damaged Eyes
Replacing damaged eyes on vinyl dolls involves careful removal and replacement. Select suitable eyes, ensuring the right size and color. Use gentle tools to detach the old eyes and secure the new ones, restoring your doll’s charming look.
Replacing damaged eyes on vinyl dolls can bring them back to life. Eyes give dolls their character and charm. When they get damaged, it affects the doll’s appearance. Fixing this issue can be a rewarding project. Let’s explore the steps to choose and install new eyes properly. `html
Choosing Replacement Eyes
Select the right eyes for your doll. Consider the size, color, and style. Measure the eye socket to ensure a good fit. Choose a color that matches or enhances the doll’s original look. Decide on the style – realistic, cartoonish, or somewhere in between. Online stores offer a variety of options. Many sellers provide detailed descriptions and measurements. Compare options to find the best match. html
Installation Process
Prepare the doll for installation. Remove any old glue or debris from the eye socket. Clean the area gently. Position the new eyes correctly. Use a small amount of doll-safe adhesive. Apply the glue carefully around the edge of the eye socket. Insert the eye and align it properly. Hold it in place until the glue sets. Ensure the eyes are level and evenly spaced. html
Securing Eyes Properly
Hair Restoration
Repairing common damage to vinyl dolls involves gentle cleaning and fixing hair issues. Use mild soap and water for cleaning. Restore hair by carefully brushing and using small amounts of fabric softener.
Vinyl dolls often become treasured possessions. Over time, their hair can suffer damage or lose its original charm. Restoring hair to its former glory can breathe new life into these beloved collectibles. This guide explores effective methods for hair restoration, ensuring your doll looks as good as new.
Cleaning And Untangling
Start with cleaning the doll’s hair. Use lukewarm water and mild shampoo. Gently wash the hair, removing any dirt or residue. Rinse thoroughly to ensure no product remains. Dry carefully with a towel, avoiding vigorous rubbing. Once clean, focus on untangling. Use a wide-tooth comb to gently detangle knots. Work from the tips upwards to prevent breakage. Patience is key during this process to maintain hair integrity.
Re-rooting Techniques
Re-rooting restores lost hair strands. This method requires precision but offers great results. Gather materials: replacement hair, a needle, and glue. Use the needle to insert new hair strands into the doll’s scalp. Secure each strand with a dot of glue. Ensure uniformity in hair distribution for a natural look. This technique can be time-consuming, but the outcome is rewarding.
Styling Options
Styling enhances the doll’s appearance after restoration. Choose styles that complement the doll’s face and outfit. Consider braiding for a classic look. Create ponytails or buns for a modern touch. Use gentle accessories like small clips or ribbons. Avoid tight bands that can damage the hair. Experiment with styles to find the best fit for your doll. Styling adds personality and charm, completing the restoration process.
Credit: www.tiktok.com
Preserving Doll Value
Repairing vinyl dolls can help maintain their value. Clean with mild soap, fix cracks with vinyl glue, and replace damaged parts. Keep them out of direct sunlight to prevent fading.
Preserving Doll Value Vinyl dolls can be treasured collectibles or beloved playthings, each with sentimental and monetary value. Ensuring they remain in top condition not only keeps their charm intact but also preserves their worth over time. The key lies in a blend of thoughtful care, strategic storage, and knowing when professional help is needed.
Care And Maintenance Tips
Regular cleaning is essential. Gently wipe your dolls with a soft, damp cloth to remove dust and dirt. Avoid using harsh chemicals or excessive water which can cause damage to the vinyl. Check for cracks or discoloration periodically. Catching these early can prevent further deterioration. You might even consider using a mild soap solution for tougher stains, but always test on a small area first. Handling dolls with clean hands is often overlooked. Oils and dirt from your hands can transfer to the doll, leading to long-term stains. Consider wearing gloves if handling them extensively.
Storage Solutions
Proper storage can significantly extend a doll’s lifespan. Avoid direct sunlight, which can cause fading and brittleness. Choose a stable, cool environment away from fluctuating temperatures. Use acid-free tissue paper or cloth to wrap your dolls, preventing any potential chemical reactions from materials. This simple step can help in maintaining color and texture. Invest in a display case if possible. Not only does it showcase your collection beautifully, but it also shields the dolls from dust and accidental damage.
When To Consult A Professional
Sometimes, the damage might be beyond DIY fixes. If your doll has deep cracks, severe discoloration, or broken parts, a professional restorer can be your best bet. Consider the value of the doll before deciding on a professional repair. For a particularly rare or valuable doll, expert restoration might be worth the investment. Have you ever faced a repair dilemma? Weigh the costs and benefits. Sometimes, preserving a doll’s value means knowing when to step back and let an expert handle the situation.
Frequently Asked Questions
How Do I Clean Vinyl Dolls?
Start by wiping the doll with a damp cloth. Use mild soap for stubborn stains. Avoid harsh chemicals to prevent damage. Rinse the doll thoroughly and let it air dry. Always handle gently to maintain its condition. Regular cleaning helps preserve the doll’s appearance.
Can I Fix Cracks On Vinyl Dolls?
Yes, you can repair cracks with vinyl patch kits. Clean the area, apply the patch, and smooth it out. Let it dry completely before handling. This process restores the doll’s surface and prevents further damage. Always follow the patch kit instructions carefully.
How To Fix Paint Damage On Dolls?
To fix paint damage, use acrylic paint matching the doll’s color. Carefully apply the paint with a fine brush. Allow it to dry completely before touching. This restores the doll’s original appearance. Make sure to test the paint on a small area first.
What Glue Works For Vinyl Doll Repair?
Use flexible adhesive designed for vinyl materials. Apply a small amount to the damaged area. Hold parts together until the glue sets. This ensures a strong and lasting bond. Always follow the manufacturer’s instructions for best results.
Conclusion
Repairing vinyl dolls is simple with the right steps. Clean the dolls gently to avoid further damage. Always use the correct materials for the best results. Handle paint repairs with care for a smooth finish. Sealing cracks prevents further issues.
Regular maintenance keeps dolls looking new. Practice patience for detailed repairs. Understanding these methods helps preserve your doll collection. Enjoy the satisfaction of restoring your cherished dolls. Keep experimenting and learning to improve your skills. Your dolls will thank you with their lasting beauty.